


Glass is one of the most commonly used material in architectural visualization. It is not only used to create exterior or interior doors and windows but it is also used for various surfaces and objects to personalize and add character to our interior spaces.
In this blog, we show you how to create glass material in Vray for Sketchup.
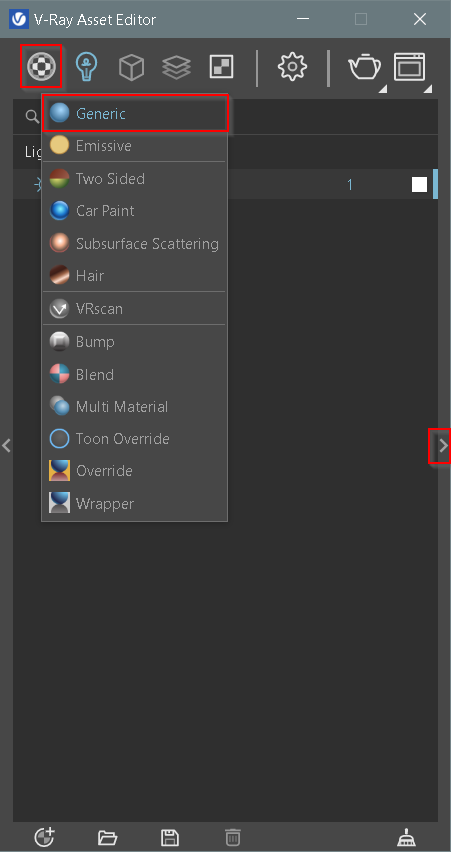
1. Create Clear Glass Material in Vray for Sketchup
First, to make a clear glass material, you need to create a generic material in the V-ray asset editor (as shown in the image below).
It is always a good idea to rename your material appropriately after you have created it.
Once you have your material created and renamed, open the V-ray material parameters by clicking on the arrow icon (as shown above)
The V-ray material parameters’ allow you to adjust individual material settings according to the desired look and finish.
Now, to create a clear glass material follow the settings given below.

- Diffuse color : Can be kept at black (lowest value) for a clear glass material as it will not have too much of an affect in this scenario.
- Reflection Color : determines the color of reflection and should be at maximum value for glass material.
- Reflection Glossiness : Displays how much of a glossy effect the material should exhibit. Maximum value can be allotted for glass materials.
- Refraction Color : This determines how light passes through the object. Lowest value is used if the material is opaque. Maximum Value is used for translucent objects like glass.
- The remaining parameters can be left as is.
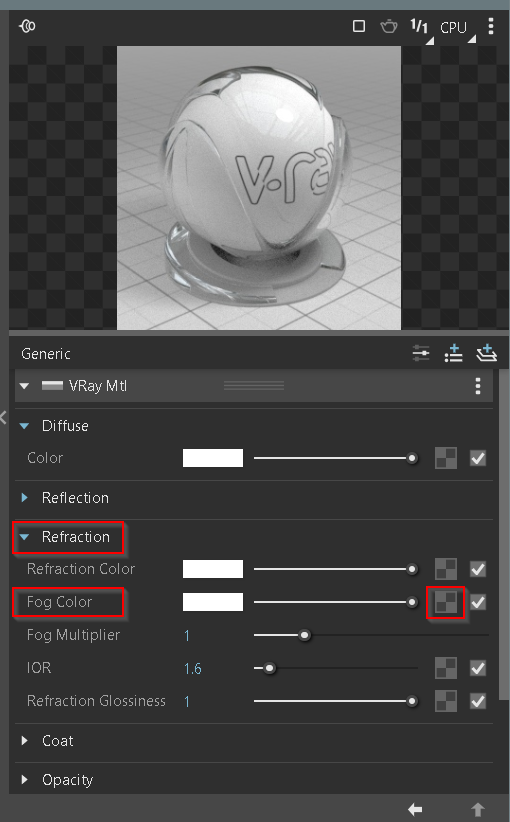
2. Create Tinted Glass Material in Vray for Sketchup
Now that we have created a clear glass material, it is fairly simple to create a tinted glass material.
We will need to apply the same V-ray material settings as we did for clear glass and adjust the Fog Color under the Refraction tab (as shown below).
Note: You can leave the Fog color value at maximum and just select the color box to adjust the fog color of the material.
You can also use the Fog Multiplier to either increase or decrease the strength of the color.

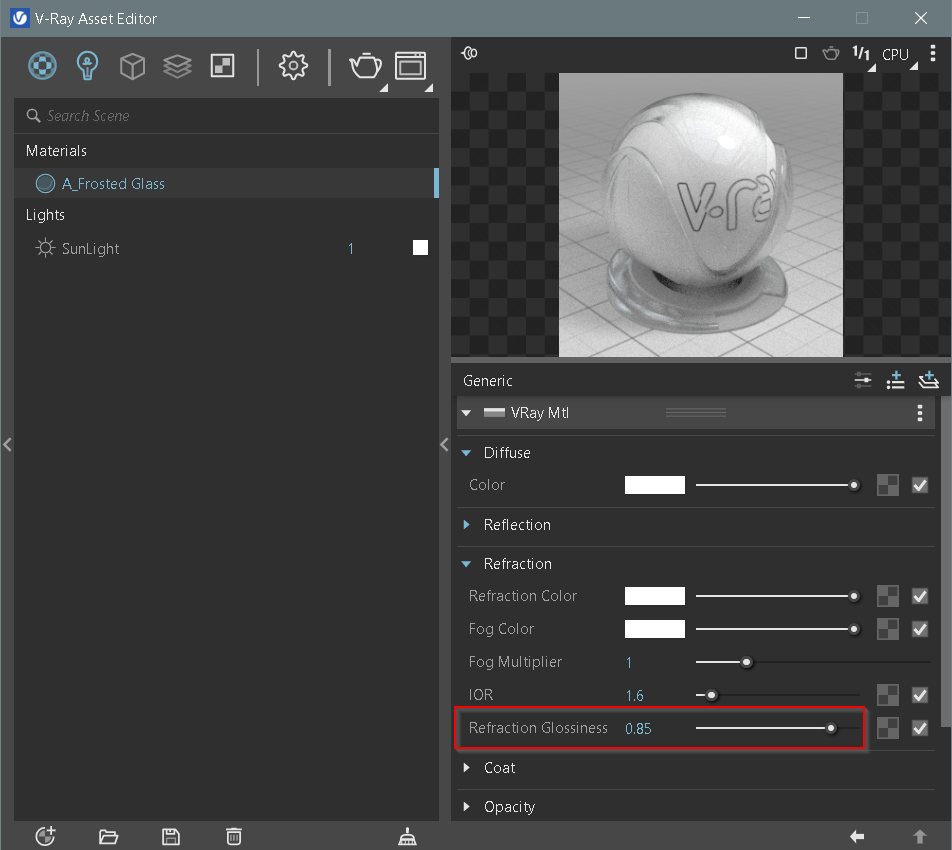
3. Create Frosted Glass Material in Vray For Sketchup
Creating a Frosted Glass material using the refraction parameter is also very simple. All you need to adjust is the Refraction Glossiness parameter.
A maximum value of 1 will keep your refractions sharp and any value below 1 will create a frosty look.
You can also add a bump map to your frosted glass material to achieve a more defined frosted look.
Note: Adjusting the Refraction Glossiness parameter will increase your render time. So, it is recommended to keep the value between 0.8 – 0.95 for a frosty finish.
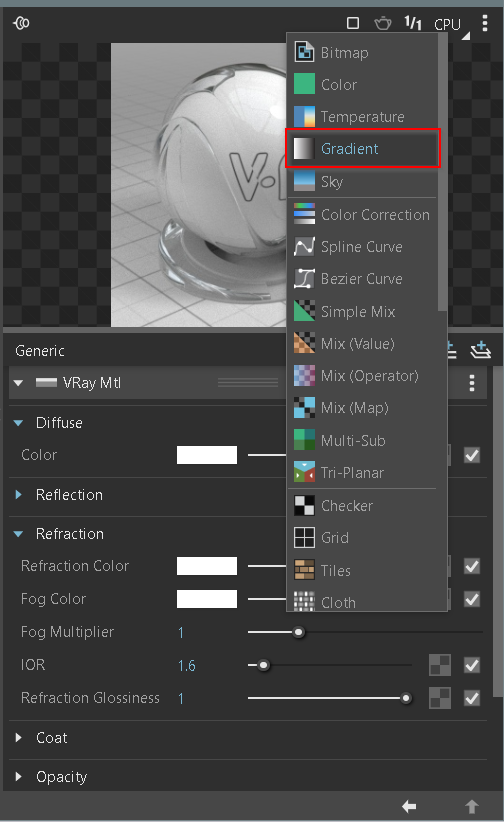
4. Create Gradient Glass Material in Vray for Sketchup
A Gradient Glass is slightly more complicated than the previous glass materials we have created so far. To get things started, we can use the same settings as we did for our clear glass material.
In the case of a gradient glass material, we need to select Fog Color under the ‘Refraction’ tab and add a gradient map (As shown in the image below).
Once your gradient map is created, follow the settings provided below

- Adjust your gradient map type to ‘V’
- Select the color you would like to use
- choose the position from where you would like the selected color to start from and fade out.

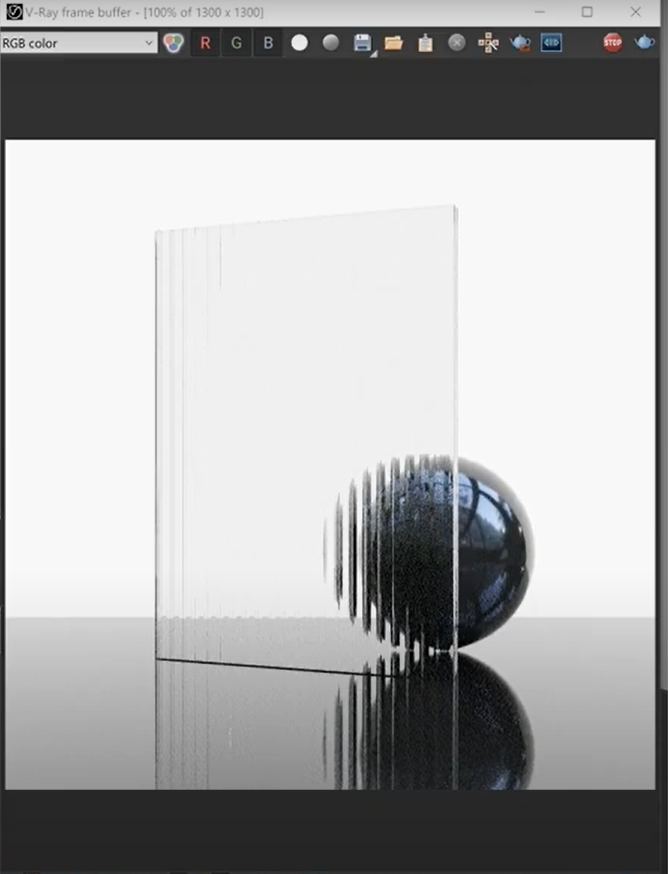
Notice how the texture did not apply properly. This is because we did not use the diffuse map as our base texture.
To adjust this, we will need the help of our texture helper under the binding parameter( As shown in the image below)

- Once you’ve applied the texture helper to your material.
- You will need to adjust the opacity of your glass material in the Sketchup default tray. The opacity value can be set to 100.
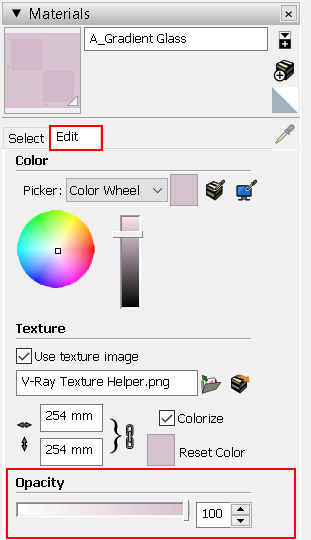
- Following which you will need to open your ‘V-ray Utilities’ Tool bar, Triple click on your Sketchup glass model and select the Tri- Planar Projection (Fit)

And Just like that we have created our Gradient Glass Material.

5. Create Textured Glass Material in Vray For Sketchup
Textured glass, probably the most visually interesting type of glass in the list. For this glass we will need to use a Bump Map to create an illusion of a 3D or textured effect on the surface of our glass.
What is a Bump Map?
Bump mapping is a texture mapping technique in computer graphics for simulating bumps and wrinkles on the surface of an object.
It primarily uses a grey-scale map to create an illusion of a raised surface when the bump map value is on white and a sunken/ Dropped illusion when the bump map value is on black.

To create a textured glass, We can use the clear glass parameters and add a Gradient map in the bump settings( As shown Below)

After the gradient map is opened, Adjust the color parameters to achieve a smooth transition between the shades. ( You can add multiple shades by clicking on the color bar followed by selecting the choice of color, under the color tab.)

Once you’ve organized your color transition, select the repeat U/V tab and increase the repetitive value. ( In this case we’ve used 26)

And finally, This is what your textured glass material will look like.
If you found this blog useful and informative, check out our Sketchup & Vray Course for Interior Designers.
If you found this blog useful, check out our other blogs on Vray.


One Response
Good, Very Good