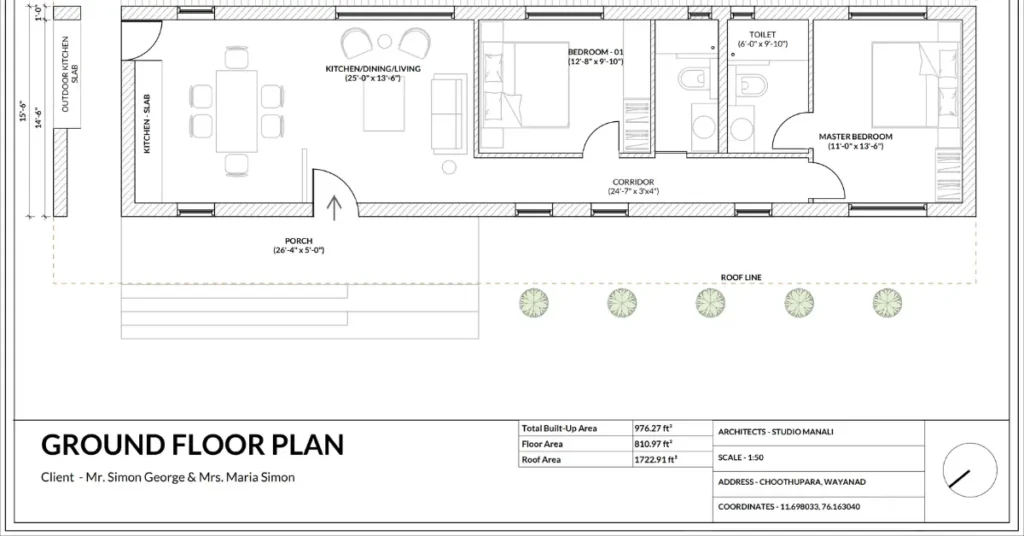
Revolutionize Design Process : Floor Plans in Layout for SketchUp
In the realm of architectural drafting, precision and efficiency are paramount. With the advent of digital tools like SketchUp and Layout, architects and designers now have the power to bring their visions to life with unparalleled detail and accuracy. In this comprehensive tutorial, we will delve into the intricacies of creating detailed floor plans in Layout for SketchUp. From setting the right units to exporting your final design, each step will be carefully explained and demonstrated, perfect for architects, designers, and anyone eager to elevate their drafting skills.
1. Selecting the Right Units:
Before diving into the intricacies of your design, it’s crucial to ensure that you’re working with the correct units. Whether you prefer feet, meters, or any other measurement system, SketchUp allows you to customize your units to suit your project’s requirements. By selecting the appropriate units from the outset, you’ll streamline the drafting process and minimize the risk of errors down the line.
2. Importing CAD Plans into SketchUp:
Once your units are set, it’s time to import your CAD plans into SketchUp. This step is essential for incorporating existing architectural drawings or site plans into your model. With SketchUp’s intuitive interface, importing CAD files is a breeze. Simply navigate to the “File” menu, select “Import,” and choose your CAD file from the directory. SketchUp will seamlessly import your plans, allowing you to proceed with scaling and refining your model.
3. Scaling the Model:
With your CAD plans imported, the next step is to scale the model to match your desired dimensions. SketchUp offers precise scaling tools that enable you to adjust the size of your model with ease. Whether you’re working on a small residential project or a sprawling commercial complex, SketchUp’s scaling capabilities ensure that your floor plans remain accurate and true to scale.
4. Moving the Model to Origin:
Ensuring that your model is properly aligned with the origin point is essential for maintaining consistency and accuracy throughout the drafting process. By moving your model to the origin in SketchUp, you establish a reference point from which all measurements and dimensions originate. This step lays the groundwork for a cohesive and well-organized floor plan, setting the stage for further refinement and detailing.
5. Checking Orientation of the Model:
Before proceeding further, it’s crucial to double-check the orientation of your model within SketchUp. Ensuring that your model is oriented correctly ensures that your floor plans accurately reflect the layout of your design. SketchUp’s intuitive interface makes it easy to adjust the orientation of your model, allowing you to fine-tune its positioning with precision and ease.
6. Utilizing the Solar North Plugin:
For architects and designers working on projects that require precise solar orientation, the Solar North plugin is an invaluable tool. This plugin allows you to align your model with the sun’s path based on your project’s geographical location and time of year. By incorporating solar orientation into your floor plans, you can optimize natural lighting and energy efficiency, enhancing the overall sustainability and functionality of your design.
7. Checking the Right Style:
Style plays a significant role in defining the visual aesthetic of your floor plans. Whether you prefer a minimalist modern look or a more traditional aesthetic, SketchUp offers a wide range of predefined styles to choose from. By selecting the right style for your project, you can ensure that your floor plans accurately convey the design intent and capture the essence of your vision.
8. Setting Up Scenes:
Scenes are a powerful feature in SketchUp that allow you to save specific views of your model for easy access and navigation. By setting up scenes for different areas of your floor plan, you can quickly switch between perspectives and focus on specific details without losing sight of the overall design. SketchUp’s scene management tools make it easy to organize and customize your views, streamlining the drafting process and enhancing workflow efficiency.
9. Arranging Tags:
Tags, also known as layers, are essential for organizing and managing the various elements of your floor plan. By assigning tags to different components of your model, you can control their visibility and manipulate them independently. SketchUp’s tagging system allows you to create custom tags for specific elements such as walls, doors, and furniture, making it easy to isolate and edit individual components as needed.
10. Saving the File:
Regularly saving your work is a fundamental principle of any digital design process, and SketchUp makes it easy to do so with its auto-save feature. By saving your file frequently, you can safeguard against unexpected crashes or technical issues, ensuring that your progress is always protected. Additionally, saving multiple versions of your file at different stages of the drafting process allows you to backtrack if necessary and explore alternative design options.
11. Sending to Layout:
Once your floor plan is complete in SketchUp, it’s time to transfer it to Layout for further refinement and annotation. Layout is SketchUp’s dedicated tool for creating detailed 2D presentations and documentation, making it an ideal platform for finalizing your floor plans. By sending your SketchUp model to Layout, you can add dimensions, annotations, and other graphical elements to enhance clarity and communication.
12. Checking Units in Layout:
As with SketchUp, it’s essential to ensure that your units are correctly configured in Layout to maintain consistency and accuracy. By verifying the units in Layout before proceeding, you can avoid discrepancies between your model and your final documentation. Layout’s unit settings allow you to customize your display units for dimensions, text, and other graphical elements, ensuring that your floor plans adhere to your project’s specifications.
13. Creating a New Tray:
Trays are an organizational tool in Layout that allow you to group related elements together for easy access and management. By creating a new tray for your floor plan project, you can keep all relevant tools and resources within reach, streamlining your workflow and improving productivity. Layout’s flexible tray system lets you customize the layout and contents of your trays to suit your preferences and workflow requirements.
14. Creating Layers:
Layers play a crucial role in organizing and managing the various elements of your floor plan in Layout. By creating layers for different components such as walls, doors, and furniture, you can control their visibility and manipulate them independently. Layout’s layer management tools make it easy to create, rename, and rearrange layers to suit your project’s requirements, ensuring that your floor plans are well-organized and easy to navigate.
15. Creating a Sheet Template:
Sheet templates provide a framework for organizing and presenting your floor plans in Layout. By creating a sheet template tailored to your project’s specifications, you can ensure consistency and professionalism across your documentation. Layout’s template editor allows you to customize the layout, formatting, and branding of your sheets, enabling you to create polished and professional presentations with ease.
16. Changing Grid Size:
Grids are a useful tool for aligning and arranging elements on your floor plan in Layout. By adjusting the grid size to suit your project’s scale and layout, you can maintain consistency and precision throughout your documentation. Layout’s grid settings allow you to customize the size, spacing, and appearance of your grid lines, ensuring that your floor plans are well-aligned and easy to read.
17. Removing Fill Color:
Fill colors can be distracting and unnecessary in floor plan documentation, especially when presenting detailed architectural drawings. By removing fill colors from your floor plan in Layout, you can enhance clarity and focus on the essential elements of your design. Layout’s fill color removal tool allows you to quickly and easily strip away fill colors from your floor plan, creating clean and professional-looking documentation.
18. Utilizing the Offset Tool:
The offset tool is a powerful feature in Layout that allows you to create parallel lines and shapes with ease. By offsetting lines and shapes in your floor plan, you can add depth and dimension to your drawings, enhancing visual interest and clarity. Layout’s offset tool offers precise control over offset distances and directions, enabling you to achieve the desired effect with precision and accuracy.
19. Moving Lines to the Right Layer:
Organizing your floor plan elements into the correct layers is essential for maintaining clarity and consistency in your documentation. By moving lines and shapes to the right layer in Layout, you can ensure that each component is properly categorized and displayed. Layout’s layer management tools make it easy to select and move elements between layers, streamlining the organization process and improving workflow efficiency.
20. Creating Text:
Text annotations are essential for conveying information and instructions in your floor plan documentation. By adding text to your floor plan in Layout, you can provide clarity and context to your design, enhancing communication and understanding. Layout’s text tools offer a wide range of formatting options, allowing you to customize the appearance and style of your text to suit your preferences and project requirements.
21. Utilizing Scrapbooks – North:
Scrapbooks are a versatile feature in Layout that allow you to store and reuse commonly used elements and symbols in your floor plan documentation. By creating a scrapbook for North indicators, you can quickly and easily add directional arrows and annotations to your drawings, ensuring clarity and orientation. Layout’s scrapbook editor lets you customize the contents and organization of your scrapbooks, enabling you to create a personalized library of resources for your projects.
22. Adding Dimensions:
Dimensioning is a critical aspect of floor plan documentation, providing essential information about the size and scale of architectural elements. By adding dimensions to your floor plan in Layout, you can accurately convey the spatial relationships between different components, enhancing understanding and clarity. Layout’s dimensioning tools offer precise control over dimension placement, style, and formatting, allowing you to create professional-looking drawings with ease.
23. Customizing Shape Styles:
Shape styles allow you to customize the appearance and formatting of shapes and symbols in your floor plan documentation. By customizing shape styles in Layout, you can create a cohesive and visually appealing presentation that reflects your design aesthetic. Layout’s shape style editor offers a wide range of options for adjusting line weights, colors, and fills, enabling you to create polished and professional-looking drawings with ease.
24. Copying Style to Another Dimension Style:
Consistency is key when creating floor plan documentation, and copying styles between dimension styles can help maintain uniformity and clarity throughout your drawings. By copying styles from one dimension to another in Layout, you can ensure that all dimensions share the same appearance and formatting, creating a cohesive and professional presentation. Layout’s style copying tools make it easy to apply consistent styles across your floor plan documentation, saving time and improving workflow efficiency.
25. Displaying Units in Dimension Styles:
Displaying units alongside dimensions is essential for providing context and clarity in your floor plan documentation. By displaying units in dimension styles in Layout, you can ensure that viewers understand the scale and measurement units used in your drawings. Layout’s dimensioning tools offer customizable options for displaying units, allowing you to choose the format and placement that best suits your project requirements.
26. Changing Units of Dimension:
Flexibility is key when working on architectural projects with diverse measurement requirements. By changing the units of dimension in Layout, you can adapt your floor plan documentation to suit different contexts and preferences. Layout’s unit conversion tools make it easy to switch between measurement units such as feet, meters, and inches, ensuring that your drawings are compatible with a wide range of standards and specifications.
27. Utilizing Hatch Patterns:
Hatch patterns are a versatile tool for adding texture and detail to your floor plan documentation. By utilizing hatch patterns in Layout, you can enhance the visual appeal of your drawings and convey information about materials and finishes. Layout’s hatch pattern library offers a wide range of predefined patterns to choose from, or you can create custom patterns to suit your project’s unique requirements.
28. Utilizing Scrapbooks – Trees & Plants:
Incorporating vegetation into your floor plan documentation adds context and realism to your designs, helping to bring them to life. By utilizing scrapbooks for trees and plants in Layout, you can easily add greenery and landscaping elements to your drawings, enhancing their visual appeal and environmental context. Layout’s scrapbook editor allows you to create a library of vegetation symbols and symbols, making it easy to add natural elements to your floor plans with just a few clicks.
29. Saving the File:
As you near completion of your floor plan documentation in Layout, it’s essential to save your work to preserve your progress and ensure that it’s protected against loss or corruption. By saving your file regularly and maintaining multiple backups, you can safeguard your hard work and have peace of mind knowing that your designs are secure. Layout’s auto-save feature makes it easy to save your work at regular intervals, minimizing the risk of data loss and ensuring that you can pick up where you left off with confidence.
30. Exporting the File:
Once your floor plan documentation is complete, it’s time to export it for sharing, printing, or further review. Layout offers a variety of export options to suit your needs, including PDF, image, and CAD formats. Whether you’re sharing your drawings with clients, collaborating with colleagues, or archiving them for future reference, Layout’s export tools make it easy to create high-quality, professional-looking documentation that showcases your design expertise.
Layout for SketchUp Course:
For those eager to delve deeper into the capabilities of Layout for SketchUp, consider enrolling in a dedicated course or training program. These courses offer comprehensive instruction and hands-on practice to help you master Layout’s features and workflows, empowering you to create professional-quality floor plans and presentations with confidence. Whether you’re a seasoned architect or a novice designer, a Layout for SketchUp course can help you unlock your full potential and take your drafting skills to the next level.
Conclusion:
In conclusion, mastering the art of creating detailed floor plans in Layout for SketchUp requires a combination of technical expertise, creativity, and attention to detail. By following the steps outlined in this comprehensive tutorial, you can streamline your drafting process, enhance the clarity and professionalism of your documentation, and elevate your architectural design skills to new heights. Whether you’re designing residential homes, commercial buildings, or public spaces, SketchUp and Layout offer powerful tools and capabilities to bring your visions to life with precision and flair. So why wait? Dive in, explore the possibilities, and unleash your creativity today!


